Starlink Hotspot Business in Kenya, Setup to Billing
Starlink Hotspot Business in Kenya, Setup to Billing
Starlink hotspot business in Kenya, from the dish to your first paying customer. MikroTik setup, billing and coverage in plain steps.
Contributor By:
Maxwell Kamau
07 Oct,2026, 9:09
Purchasing a Starlink dish is not a Wi-Fi business, it is the pipe. The business begins at the end of the pipe, in the router which shares it, the system which determines who may use and whom will not, the packages which sell it, and the coverage which enables customers to reach.
What Starlink is, and why hotspot owners use it
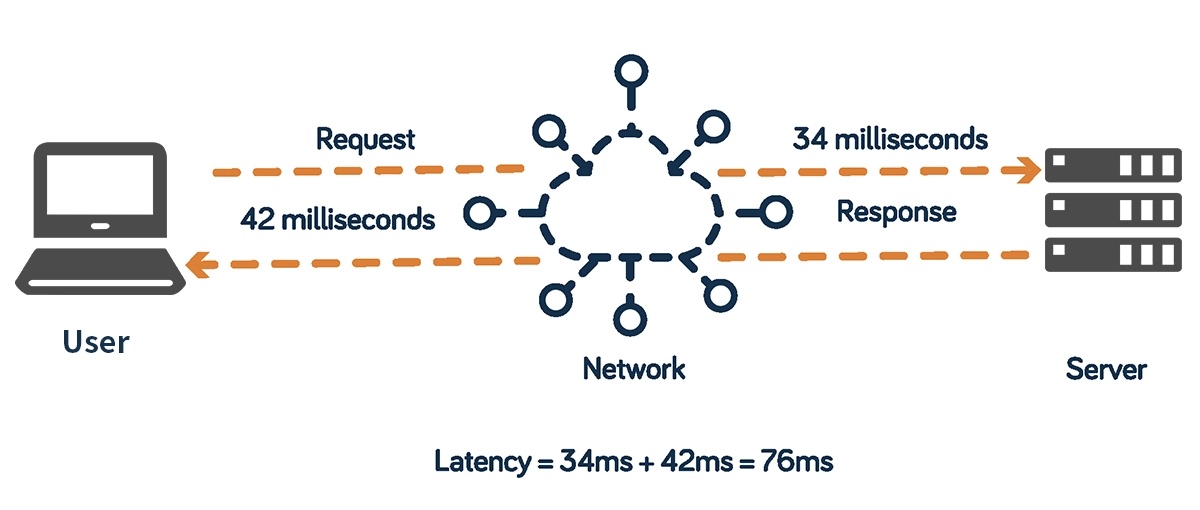
Starlink is SpaceX's satellite internet service. Past satellite internet services placed their satellites far away, some 36,000 km above the earth, and the signal took a hefty 600 milliseconds to bounce from your computer up and back down. Starlink's thousands of small satellites orbit closer, only a few hundred kilometers above the earth, and the latency drops to a 4G-like 20-50 ms.
For a hotspot owner in Kenya, the appeal is simple; fibre does not reach everywhere, and 4G can be saturated. Starlink works anywhere the dish can see open sky, and can start a hotspot in a market, a rural trading centre or an estate ignored by the big fibre providers. It also attracts new ISPs as their upstream, which is the connection that feeds your whole network.
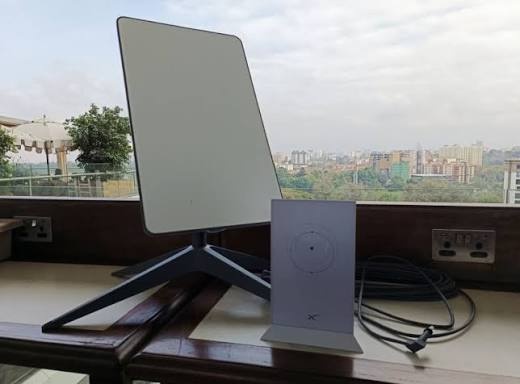
Two parts of the kit matter here. The dish, nicknamed Dishy, communicates with the satellites. The Starlink router is a basic Wi-Fi router in the box. For a hotspot business you will use the dish and replace the router with a MikroTik, for reasons given below.
Requirements before you start
The correct plan. Starlink sells residential, roaming and business plans, and the terms differ. Residential plans are for personal use. A hotspot business which resells the access to the public should look at Business plans, and read Starlink's current terms or ask an authorised reseller before purchasing.
Equipment
At a minimum you need:
A Starlink kit including a mount.
A MikroTik router with enough CPU for your users.
Access points, either MikroTik or similar, depending on your coverage plan.
Outdoor-rated Ethernet cable, surge protection and grounding.
A UPS or solar backup, because the dish requires a steady amount of power (roughly 75 to 100 watts on the standard kit) and Kenyan power cuts will otherwise take you offline.
A clear sky view. The dish needs an open view of the sky. Trees, buildings and even a water tank can obstruct it. Each obstruction causes short outages, which customers notice quickly. The Starlink app has an obstruction checker, so test your mounting spot with it before you drill anything.
Billing and payments. You need a system that handles vouchers, plans and M-Pesa, and a Paybill or Till number for the money. More on this later.
The technical flow, step by step
Here is customer's request as it flows through your network. Go through it once, and every subsequent setting will make sense.
Dish to router. The dish sends data to the satellites and back. Its cable is plugged into the Starlink power supply and router, and that provides the internet to your MikroTik.
Bypass mode. Set the Starlink router to bypass mode (in the Starlink app, or with the Ethernet adapter on kits which require one). The Starlink router ceases to act as a router and passes the connection straight through. This avoids double NAT, which is two routers translating addresses, and gives your MikroTik full control.
WAN side of the MikroTik. The MikroTik's first Ethernet port connects to Starlink. It receives an address by DHCP client.
CGNAT. On most Starlink plans, your WAN address is not a public address. It is behind carrier-grade NAT, meaning many customers share one public address. This is fine for browsing, but other devices cannot reach you. Business plans may give a public IPv4 address, which allows remote access.
NAT masquerade. The MikroTik translates your customers' private addresses into the one WAN address, allowing them to share a connection.
LAN side. Your access points and customers are behind a bridge, with a DHCP server giving each device an address.
Hotspot or PPPoE. Hotspot customers meet a login page before getting internet. PPPoE customers authenticate with a username and password on their own router. Both ask the same question: is this person allowed in?
RADIUS. The MikroTik asks a RADIUS server for the answer. RADIUS has three functions: authentication (who are you), authorisation (what may you do, such as speed and time) and accounting (how much did you use).
Billing system. The billing platform tells RADIUS whether the customer has paid. Payment confirmed means allow access. Plan expired means disallow access.
A few settings are worth knowing about, shown below as an example only. The actual values will depend on your RouterOS version and billing platform, so follow your platform's guide.
/ip dhcp-client add interface=ether1 disabled=no
/ip firewall nat add chain=srcnat out-interface=ether1 action=masquerade
/ip hotspot profile set [find] use-radius=yes
/radius add service=hotspot address= secret=
/radius incoming set accept=yes
One extra trick helps with monitoring. The Starlink dish has its own status page at 192.168.100.1. Behind a MikroTik you cannot reach it by default, so add a second address on the WAN interface in this range. You can then view obstruction data and outages from your own network.
Why a VPN often sits in this flow
Due to CGNAT, your MikroTik can call out to a RADIUS server, but the server cannot call back in. This affects disconnecting people. When a plan ends, the billing system sends a disconnect message to the router and that message must go inward. Many ISPs solve this by having a tunnel (WireGuard, OpenVPN or L2TP) from the MikroTik to the server, giving both ends a stable path. It also allows you to manage the router remotely with Winbox. A public IP on a business plan can do the same thing without a tunnel.
Billing integration with Noch Wired
Once the network flow is understood, billing is the part that makes it a business. Noch Wired is built around the same chain described above. The MikroTik acts as a RADIUS client, the platform acts as the RADIUS server, and payments feed into the decision.
For a hotspot customer, the journey looks like this. The customer joins your Wi-Fi and the MikroTik redirects them to the login page. They select a package and pay by M-Pesa. When the payment is confirmed, Noch Wired tells RADIUS the customer is allowed and the router opens access, and the clock starts. When time or data runs out, the platform ends the session through the disconnect path described above.
For PPPoE customers, each home has an account with its own plan and due date, and the router checks it at every connection. Noch Wired supports both on one platform, along with Paybill and Till payments, automatic reminders and a customer portal.
Two practical details trip people up. First, the walled garden, which is the short list of addresses customers may reach before they log in. It must include your login and payment pages, or the page will not load. Second, the shared secret and server address must match on both sides exactly. Noch Wired's blog has step-by-step guides for adding a MikroTik router, so follow those instructions.
Selecting packages: for you and for your customers
Two decisions sit here. First, which Starlink plan to buy. Second, which packages to sell.
Choosing your Starlink plan. Look at three things: how many customers you expect, whether you need priority data (important in busy hours), and whether a static or public IP helps your setup. Business plans are tiered by priority data, and names and prices differ between the official site and resellers. Compare current numbers, then choose the smallest tier that comfortably covers your peak evening use.
Designing customer packages. Sell in a way your customers already think. Most hotspot owners offer a mix of time-based and data-based packages. A made up layout with prices is as follows:
Package Duration Speed cap Best for
Hourly 1 hour 3 Mbps Quick browsing
Daily 24 hours 5 Mbps Casual users
Weekly 7 days 5 Mbps Students, regulars
Monthly 30 days 8 Mbps Heavy users
To check that your prices work, add up your monthly costs: the Starlink bill, power, licence fees, equipment repayment and maintenance. Divide by the number of customers you realistically expect. If your price per customer sits below that number, you lose money before you start.
Contention ratio. This is the ratio between the speed you sell and the speed you actually have. Say your Starlink delivers 150 Mbps in real conditions, and you sell 5 Mbps caps to 100 customers. That is 500 Mbps promised on 150 Mbps real, a ratio of about 3 to 1. It works because customers are rarely all active at once. Push the ratio too high and evenings turn into crawling. Watch your peak usage, and stop selling before the pipe is full.
Queues. On the MikroTik, per-customer speed caps are set with queues. Simple queues work for small setups. PCQ (per connection queuer) shares bandwidth evenly among active users, so one heavy downloader cannot take everything. Newer RouterOS versions also support smart queue types like fq_codel, which keep latency low under load.
Coverage optimisation
A strong dish is wasted if customers cannot reach the signal. Coverage is where many new hotspot owners lose customers.
Place access points high and in the open. Mount them above head height, away from metal roofs and thick walls. One well-placed access point often beats three badly placed ones.
Choose bands carefully. The 2.4GHz band travels further and passes through walls better, but it has only three clean channels (1, 6 and 11) and gets crowded fast. The 5GHz band carries more data and has many more channels, but its range is shorter. Many hotspots run both and let capable devices pick 5GHz.
Mind channel width and power. In crowded areas use 20MHz channels on 2.4GHz to reduce interference. Higher transmit power is not always better. If your access point shouts louder than a customer's phone can answer, the link is one-way and slow. Match power to the area you want to cover.
Limit clients per access point. Each access point shares its airtime among everyone connected. A rough guide is around 30 to 50 active clients per unit, depending on the hardware. Past that, add another access point instead of raising power.
Use CAPsMAN for several access points. On MikroTik, CAPsMAN is a controller that manages many access points from one place. It keeps settings the same and supports roaming between them. For roaming to feel smooth, look for support for 802.11k, 802.11v and 802.11r.
Extend with point-to-point links. To reach a far estate or building, use a directional 5GHz link, with a dish at each end pointing at the other. Both ends need a clear line of sight. This brings the Starlink connection to a second site without a new dish.
Plan for failure. Starlink drops for short moments, and power cuts happen. A UPS keeps the dish and router alive during short outages. For serious businesses, add a second WAN, such as a 4G router, and use the MikroTik's failover features to automatically switch over. Customers stay online and never know a link failed.
Cabling and protection. Ethernet runs should stay under 100 metres, use outdoor-rated cable and have surge protection on each end. Ground your masts. Lightning is a real risk in many parts of Kenya, and one strike can destroy a router, an access point and a dish together.
Common mistakes to avoid
Using the Starlink router as your hotspot. It lacks the control you need. Use bypass mode and a MikroTik.
Overselling the pipe. More customers than your capacity makes everyone unhappy.
Ignoring sky view. A dish behind a tree causes constant small drops.
Skipping backup power. One outage can empty your till for the day.
Forgetting the walled garden. Customers see a blank login page and leave.
Setting up without legal checks. Confirm licence and plan terms before you invest.
Before you switch on
Run through this list the day before launch:
Starlink plan and licence terms confirmed.
Dish mounted with a clear sky view and obstruction checked in the app.
Starlink router in bypass mode, MikroTik receiving an address.
NAT, DHCP and hotspot or PPPoE configured and tested.
RADIUS connected to your billing platform, and a test payment completed.
Walled garden includes your login and payment pages.
Queues set, so each package gets its speed.
Access points placed, tested and spaced out.
UPS or solar backup connected.
Support contact visible to customers.
Ready to connect the billing side? Click Try it free on Noch Wired, add your MikroTik router, and run a test payment before your first real customer walks in.
Popular Posts